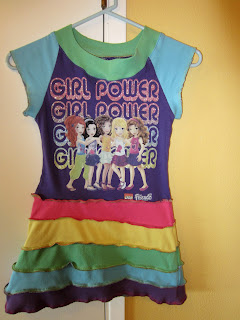
I hope you enjoyed part A of the Rainbow Upcycle Lego Dress tutorial for making the skirt. Now, let's make the sleeves and neck look purty!
At first, I thought I would just serge the sleeve edges to give them some color. Not liking the look of it, I decided, instead, to do a true upcycle and take some of the fabric from my old tee shirts and make a new neckline and new sleeves.
First step, cut off the neckline, staying as close to the original as possible.
Next, cut off the sleeves at an angle.
Doesn't have to be exact but I would say that mine is a 60 degree angle.
(for you math types)
Save the parts. These are your pattern pieces!
Cut open the sleeves, as above, and lay one of them on your fabric. I have two pieces of fabric here. Trace about 3/8ths of an inch all the way around. I have some tools for this job but you don't need them.
Look at your tracing and check to see if it looks even on both sides.
Fold the fabric in half, at the middle of the piece, and cut out your sleeves on the tracing. By folding them in half first, you insure they will be symmetrical. When you open them up, they will look like this.
Serge or hem them. I serged with my rainbow of colors.
You can use a rolled edge or regular serged edge.
Join the two small edges and sew or serge them closed.
What you see here is going to be the inside of my sleeves.
See, it will line up nicely when you are done.
Pin your sleeve and tee, right sides together.
This is very important!! When you sew the sleeves to the bodice, you want to leave the middle three inches (give or take, depends on the size dress you are making) open for the shoulders. You can see below that I did not make the purple bodice pieces meet. There are three inches left on my sleeve piece where it is not attached to the bodice.
Now, we are ready to work on the neckline. First, measure around the opening. Mine measured 23 inches around.
Next, measure the piece of neckline you removed. Cut it and lay it flat.
Mine measured 19 inches. The rule of thumb for making a neckline from knit fabric is to use stretchy fabric with good recovery and cut it at 85% of your neckline size.
So, .85 times 23 is 19! Perfect.
Note: recovery means how much your knit fabric will stretch back. My
old tees are pretty stretchy. I stretched the pieces a few times and
they did go back to original length. Some rib knits do not. They will
stretch out and stay there, which can be a major PITA. I have learned
that the hard way! You end up with a neckline that stretches out and
looks wonky and doesn't lay flat. I now take my fabric and test the
stretchiness before I attempt to use it for necks, cuffs, etc. If it
doesn't stretch out and back nicely, it doesn't get used. Here is an excellent blog post by One Little Minute about the types of knit fabrics.
So, let's make a neckline! Cut your knit fabric the appropriate length by 4 inches. 4 inch width should work for any girl size 4 and up.
For a toddler or baby, you might want to use 3 inches.
Sew the ends together and fold in half. Iron in half.
I will now refer you to my friend Kristi's fabulous video tutorial on how to sew the binding to the neckline. If you do not have a serger, just do a zigzag stitch instead.
And voila!
One true upcycle dress, Rainbow colors, Lego Friends tee in the middle!


Love!! Thank YOU
ReplyDelete