Showing posts with label giveaway. Show all posts

Thursday, June 26, 2014

Sewalong giveaway and linky party


For all Tie Dye Diva sewing pattern fans and sewalong participants, I have put together some great prizes.  Because the sewalong was not as big as I had hoped, I am opening up the prizes to anyone who has sewn the Tie Dye Diva sewing patterns Easy Peasant and Storybook Pinafore.

Here is how to enter: 

1.  You can share your sewing here, in the linky party, or you can share on the Tie Dye Diva Facebook page.  That sharing earns you one entry.

2. Go to the giveaway information post and visit the sponsor's stores and post back about what you like. This earns you another entry.

It's that simple! 


Note:  For the linkup, you can add a picture from instagram, a blog, photobucket, or another photo sharing site. It's that easy!!


Monday, September 9, 2013

Fabric Giveaway!

After a great summer off from blogging, I am back and want to connect with more of you. So, I am having a small giveway to entice more of you to follow me. I hope you like it!


I will choose two winners, one for each item. 

Please note the Facebook page must reach 300 likes for item #2 to be part of the giveaway!

First item to be given away is a two yard set of Art Gallery Modernology fabrics.  This is four one half yard cuts of each of these lovely fabrics. Two yards in all!


Second item is the very hard to find Michael Miller Lava Blooms fabric in SAGE green. This is not apple green.  This is Sage green. See the pink flowers. Apple green has dark pink flowers.  This is enough to make a bodice for a small girl or maybe sleeves for several dresses. Almost impossible to find!! 

This item will not be included in the giveaway unless I reach 300 fans on my Facebook page, so please refer friends! The refer-a-friend option is only available for paying Rafflecopter customers, of which I am not, so I have to ask you pretty please to do this on your own!  Thanks a million!! Maybe some day I will generate enough buzz to warrant paying for more Rafflecopter choices!!


a Rafflecopter giveaway


Isn't this fun!  This giveaway Tuesday September 17th and I will share the winners on Wednesday the 18th.  Have fun and please refer some friends!! 


Tuesday, September 3, 2013

Cotton/lycra Knit headband tutorial


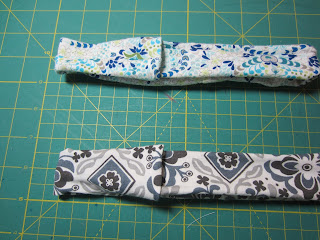
Around these parts, my girls love to wear soft headbands. They both have long hair and the soft headbands are a much more comfortable solution to hair control than the hard plastic or metal ones.  We can buy a Scunci brand pack of them at the mall for a few  bucks but it is much more fun to have them match one's clothing! Since I made some cotton knit tops for my oldest daughter to wear to school, I decided to make some headbands to match.  I was very surprised to find not one tutorial on how to do this simple project, so I made one.  Tomorrow, I will share the tops these cuties match.  For now, enjoy the tutorial. This is a great way to use your knit scraps.


 The finished project will look like this one, above. You are going to want to use cotton knit fabric with stretch to it. My fabrics are all part lycra and have good stretch and release. It is hard for me to tell you exactly what fabrics to buy but if they have some lycra and they stretch out and back and still look nice, you will be fine.  

You will also need a ball point sewing machine needle for this project.


 1.  Our store-bought headbands are 9 inches long by 2.5 inches. We will be making 9 by 1.5 inch headbands. You can make yours any width you want. If you have a very young child, you might want to shorter the length.

 2. Cut out two rectangles per headband. 
Each rectangle should be 10 inches by 4 inches.  I like to wing it on the seam allowance for things like this but if you like exact, then use a 1/2 inch seam allowance.

 3. Right sides together, sew one end together on each headband.  


 Note: use stretch stitch or tight zig zag. 
I am pointing to stretch stitch on my machine. 
It looks like a lightning bolt. This stitch will give
your knit fabric some stretch but still have a tight seam.  
A straight stitch might pop when your child uses her headband.

 4. Fold in half length-wise and sew the length, right sides still together.  
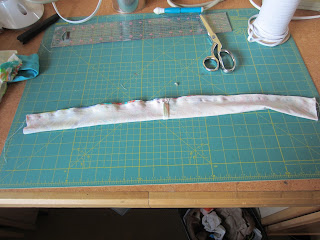
You should now have one long tube. 

 5. What do you use to turn tubes right side out? I use my Dritz Tube Turner! 
(I wish that was a sponsored comment, but it is not! I just love this doohickey!)

 Here's how it works. 
You stick the tube in, use dowel to push a bit of fabric inside and then 

 you stand it up and pull fabric down. 

 Voila! Right side out tube!

6. You now have a 19 inch tube. 


7.  Take one side of your tube and fold fabric in 1/2 inch. 
See both pics above for how that looks. 

 
 8.  Stick the other end 1/2 inch inside the tube. 
You now have one side folded in 1/2 inch and the other side laying in the tube 1/2 inch. 

 9.  Sew a 1/2 inch square to contain this end.  
Your headband is done!  


 10. Yay! You now have some nice headbands to match your handsewn clothing!

Tomorrow, I will share some of the clothing I made with the above fabrics and I will also let you know about the giveaway I am doing! I will be giving away some hard to find fabric!   I've also been pattern testing and cannot wait to share about that!


Wednesday, October 17, 2012

Cold care, petting fabric, and a winner!


 For the last week, I have been longing to sew, having plans to sew, even have dresses cut out to sew, but I have been stymied by a bad sinus infection! I have the worst sinuses known to mankind, seriously, and get a bad sinus infection at least once a year. This is an improvement over my college years where I would get them every other month. After a long road of health improvement, including seeing chiropractors, naturopaths, osteopaths, our family doctor, and finally one very very good otolaryngology specialist (ear, nose, throat), I finally have a good routine in place to keep them manageable. Along with a neti pot for sinus rinsing, here is my routine: Gypsy cold care tea, Alka-seltzer plus cold day and night, Flonase sinus spray, Sambucol elderberry, no refined flour or sugar products, no alcohol, probiotics, lots of rest, and Augmentin antibiotic if it gets really bad, like now.  Seriously, I have the worst sinuses in the world!  I could have surgery but as that is only 50% effective, I decided against it. Anyway, this means my kids clothing week challenge sewing is delayed until my head stops feeling like a vice is crushing my brain.


 In the meantime, I got some lovely fabrics from Europe that I have sitting on my sewing work area so I can pet them occasionally! Here they are!  They are so soft and pretty!  I am super lucky to have some wonderful friends who are able to import this stuff to the USA at a reasonable price.  Sewing friends are the nicest people in the world!!


And speaking of sewing friends, the winner of the halloween fabric giveaway is Connie! She just so happens to be a friend. Seriously, randon number generator generated number 3!  So, congrats to Connie and stay tuned for more sewing from me soon!!!


Tuesday, October 9, 2012

KCWC2: The American Mama Store Dresses

This is quickly becoming my favorite pattern: Jocole's Crossover Tunic or Dress. This is such a versatile dress/top/tunic. So, for day #2 of Kids Clothing Week Challenge, I made my youngest daughter this great dress. Because the pattern comes with a doll version, I whipped that one out, too. She was very excited to see them and told her father that these are not from the American Girl Doll store but from the American Mama store! 


This fabric, which is absolutely amazing, is Valori Wells Karavan knit. It is a lovely, and I do mean lovely, cotton interlock with a slight amount of stretch to it.  This is the Kashmir print in Indigo.  I have been sewing with knits for a few years now and, while I am no expert, this is among my all time favorite knit fabric. 

Here is the doll version. This is an 18 inch Madame Alexander doll, but she has the same measurements as an American Girl doll. The pattern was easy to sew for my daughter but the doll dress was a tiny bit complicated. The first go round, the binding was too narrow for her hand to fit through!  Her hand is open wide and it would not fit through. So, I had to start over and made the sleeve a tiny bit longer and wider and did not use binding at all.  I did bind the neckline as one would for a girl.  Very pretty, I think.


Here is my oldest in her tunic I made her a few weeks ago.