Saturday, June 30, 2012

Where do you sew!

Pink Chalk Studio


It is where I sew month on Pink Chalk's blog!  What a fun idea! I posted a link to my space,  why don't you post a link to yours?

Here is what I wish I had today.  Today was very rainy and I am parenting alone  AND trying to get some sewing done.  
 
I got buried in some lovely Delilah!  

But I kinda wished for this, a sunny day and a lovely drink. LOL! This is the view from my sewing table, but it doesn't usually have a fruity beverage in it.

 
When is summer going to come to the Pacific Northwest?? We've been at 64 and rainy for weeks!


Thursday, June 21, 2012

Happy Broad Brim Hat


It's Happy Home Blog Tour Time!  Happy Home is the new book Jennifer Paganelli, of Sisboom.   It was co-authored by Dolin O-Shea.  This is a fun book with a lot of easy to medium patterns, including cute pillows and decorative elements like a party banner, pretty aprons, stockings, and bedding items like a quilt, bed skirt, and even a lovely canopy!  My girls are in love with the last one, so we may have to try it out soon!  There are also patterns for accessories like pretty fabric-covered boxes, totes, bags, and a lovely hat, called The Broad Brim.  

Here's my version of The Broad Brim:

 That's me and yes that is as good a pic of me as you are going to get with that wee camera.  I wish I had a nicer one!
Here is the finished hat.  This is all made from Jennifer's Crazy Love line of fabric for Free Spirit.  I love this line! Such pretty patterns and vibrant colors. 


I used an embroidery stitch to add a little detail.

Now, for a review of the pattern. I felt this was a pretty easy pattern to follow but I had a hard time picturing how to do things.  I am a visual learner and there are not a lot of graphics. That is my own problem, and not a ding on the pattern.  I read each direction step several times before sewing and really only had to rip out seams once.  I chose to leave off the casing for the shoe lace because I have a big head and I knew I would not need to tighten this hat.  It fits a head 21.5-24 inches in circumference and my head is 24 inches!  I did take pics of a few hints for people to try when they do this pattern.

Tip #1: cutting out a perfect circle. The top of the hat must be a perfect circle, so here is a tip.  Make your pattern piece by folding a piece of tracing paper in fourths and cutting out a piece of pie. When you open it, it will be a perfect circle.  

 Now, do the same thing for the fabric.  Pin the pattern piece and the fold and fold again, like this picture below:
 Cut it out.
 Open it up and you have a perfect circle!

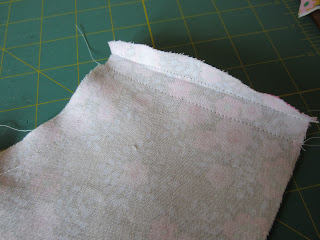
Tip #2:  Trim the excess layers of interfacing before you sew parts together.
Tip #3: Use a lot of pins!!!
 Tip #4: Every time you sew something wrong side out, turn it right side out and check how it looks before you move on. 
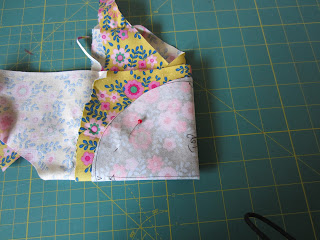
 Tip #5: When it comes time to sew on the crown, you might need to unpin and make a size adjustment so it will fit well.  (seen below, I had to take it in a half inch)

Tip #6: Make sure your hat looks good on the outside
 and the inside!

And then enjoy!!


Tuesday, June 12, 2012

Happy Home Craftalong!

I am honored to take part in the Happy Home Craftalong, hosted by Jenny of Sew Pretty Dresses.  This should be great! I ordered the lovely new Jennifer Paganelli Book from Amazon.  It arrived a few days ago and my girls and I have been ogling it ever since. We cannot decide what to do first!  But, we will, in time to post next week, June 21st. 


Here is the blogroll:


June 11 Jenny Fish www.sewprettydresses.blogspot.com

June 12 Cathy Caprio Peckiconis http://sewingstoryproject.blogspot.com/

June 13 Judy Buchanan  www.hickity-pickity.blogspot.com/

 June 14 Guest on Sew Pretty Dresses: Shannon Branscom Winters www.sewprettydresses.blogspot.com

June 15 Leah Kinghorn  http://makinglifewonderful.blogspot.com
June 16 Monique Reynolds  sewfunbymonique.blogspot.com/

June 17 Melissa Peda  100billionstars.com/

June 18 Jamie Harned http://theinsecurequilter.blogspot.com/

June 19 Stephanie Messer Danko www.tabbodesign.blogspot.com/

June 20 Kristi Pernell Elston  burlapbutton.blogspot.com

June 21 Kathy Hennessey  http://handmadedresshaven.blogspot.com/

June 22 Courtney Watford Davis www.sweeterthancupcakes.blogspot.com/

June 23  Guest on Sew Pretty Dresses: Jade Nocella Jenny Fish   www.sewprettydresses.blogspot.com


June 24 Sally Keller http://sallysangelworks.typepad.com

June 25 Tour Wrap Up www.sewprettydresses.blogspot.com


First up, however, my baby turns 5 tomorrow and we have been having a lot of mommyandme fun since she finished up preschool two weeks ago.  *SOB*  My baby is growing up!

 Here she is at 30 minutes old


 Six months old
 Two years old, mama's first attempt at sewing an Ottobre pattern!


Five years old, mama's own pattern!

Happy Five Years, Eliza!!


Sunday, June 3, 2012

Adjusting a pattern to fit an nonstandard size


 Welcome to post #2 in the Making your own patterns series.  In this post, I will show you how to take a pattern and adjust it to fit a body that is not standard sizing.  You might have a person who is a size 12 in the waist but 8 in height.  She might need a 10 in length of bodice but 8 in length of skirt.  So, what do you do? Here you go!!

 First of all, take very good measurements.  Measure chest circumference, waist circumference, from shoulder to waist, hip circumference, and waist to where you want hem to end. If your item has an empire or dropped waist, take that into account when you are measuring.  Draw it out if it helps you.  I prefer just to write it down, but drawing it out helps others a lot! 

This might be hard to see, but here is the size chart for the Portabellopixie Claire pattern I use when I make a peasant dress.  It only goes up to size 8.  If you look closely, you can see that the waist sizes increase by increments of one half inch or three quarters of an inch. So I was able to size the pattern up pretty easily by taking good measurements.   The person I am sewing for has a 30" chest and needs the dress to be 32" from shoulder to hem.  This dress has a slightly empire waist and her waist measurement is also 30".  Because this is a dress with elastic around neckline, her shoulder width will not matter much.  The dress should still fit. 


 So, if you look closely at this picture,  you can see I added the appropriate increments to increase the pattern to a size 12 to accommodate her chest circumference.  I am keeping her shoulder to waist measurement in my head at the moment.


Another view.


Closeup
 

Fast forward to the sleeves, front ruffle and sash being all done! Back and front are sewn together. This girl measures 10 inches from shoulder to waist and I have made sure it fill fit that by adjusting as I sew.  In this case, I took a bit off the waist of the bodice before adding the sash, in order for it to be 10 inches from shoulder to waist.  Voila!
 

This girl is 30 inches around and this waist will measure 32 inches. Since it has a sash she can tie in back to make it fit better, this should fit perfectly!!
 

Now, for the elastic for the bodice neckline and sleeves.  As you can see below, there is one half inch between sizes for neckline elastic and one quarter inch between sizes for sleeve elastic.  So, it was easy to add up to what would be a size 12.  Because I would rather this be slightly loose than snug, I went with size 12 for elastic sizing, as that is also her waist size.
 
  
Elastic is all cut and ready to go.


Now, on to creating the skirt.  In this case, it is one piece with an attached ruffle.  This Children at Play Parade Print measures 14 inches so I needed another 7 inches or so to get to the 21-22 inches I need for the skirt.  I want the finished dress to measure 32 inches from shoulder to hem, and the bodice is 10 inches, so I need 21-22 inches.  And that is how I cut my fabric!  


All done!


Close up
 

Back view
 

Don't be afraid to play around with sizing on pdf patterns.  Paper patterns will be harder to adjust since the sizing is less standardized.  But, pdf patterns are usually pretty easy to adjust if you measure very carefully and write it all down, even draw it out.  You can do it! There is no such thing as a standard human body, anyway, so this really helps you sew in a more tailored way.

Happy sewing!