Showing posts with label tutorial tuesday. Show all posts

Tuesday, June 18, 2013

Teacher Totes


 It's that time of the year, time to thank teachers for all they do for our children. Since I was an elementary teacher for ten years, before having kids, I feel especially grateful to teachers.  I know how hard they work!!  

This year, my go-gift is my Perfect Cloth Shopping bag.  Find the free tutorial here


I LOVE this fabric I found at Joann's Fabric Store. The best fabric is in the home decorator fabric area, but not on the 60" long rolls. Look for the less expensive home deco fabric on 44" bolts.  And look for it to be 40% off, like I do. This fabric is from Richloom fabrics.  Be sure to look for fabric that can be washed. You definitely want to be able to wash your cloth shopping bags!  Most likely, they will be washable on cold, delicate, air dry.  

I made several of these and I think they turned out lovely


The print is so pretty and fun!


Thanks for reading!

Friday, May 17, 2013

Rainbow Upcycle Lego Dress - a tutorial (part B)


 I hope you enjoyed part A of the Rainbow Upcycle Lego Dress tutorial for making the skirt. Now, let's make the sleeves and neck look purty!


 At first, I thought I would just serge the sleeve edges to give them some color. Not liking the look of it, I decided, instead, to do a true upcycle and take some of the fabric from my old tee shirts and make a new neckline and new sleeves. 

First step, cut off the neckline, staying as close to the original as possible.


Next, cut off the sleeves at an angle.  
Doesn't have to be exact but I would say that mine is a 60 degree angle.  
(for you math types)
 

Save the parts. These are your pattern pieces!
 

Cut open the sleeves, as above, and lay one of them on your fabric.  I have two pieces of fabric here.  Trace about 3/8ths of an inch all the way around. I have some tools for this job but you don't need them.
 

Look at your tracing and check to see if it looks even on both sides. 
 

Fold the fabric in half, at the middle of the piece, and cut out your sleeves on the tracing. By folding them in half first, you insure they will be symmetrical. When you open them up, they will look like this.  


Serge or hem them.  I serged with my rainbow of colors.  
You can use a rolled edge or regular serged edge.


Join the two small edges and sew or serge them closed.  
What you see here is going to be the inside of my sleeves.


See, it will line up nicely when you are done. 


Pin your sleeve and tee, right sides together.


This is very important!! When you sew the sleeves to the bodice, you want to leave the middle three inches (give or take, depends on the size dress you are making) open for the shoulders.   You can see below that I did not make the purple bodice pieces meet. There are three inches left on my sleeve piece where it is not attached to the bodice.  
 

 Now, we are ready to work on the neckline. First, measure around the opening. Mine measured 23 inches around.


Next, measure the piece of neckline you removed. Cut it and lay it flat. 
Mine measured 19 inches. The rule of thumb for making a neckline from knit fabric is to use stretchy fabric with good recovery and cut it at 85% of your neckline size. 
So, .85 times 23 is 19!  Perfect.  


Note: recovery means how much your knit fabric will stretch back.  My old tees are pretty stretchy. I stretched the pieces a few times and they did go back to original length. Some rib knits do not. They will stretch out and stay there, which can be a major PITA. I have learned that the hard way!  You end up with a neckline that stretches out and looks wonky and doesn't lay flat. I now take my fabric and test the stretchiness before I attempt to use it for necks, cuffs, etc.  If it doesn't stretch out and back nicely, it doesn't get used. Here is an excellent blog post by One Little Minute about the types of knit fabrics. 

So, let's make a neckline! Cut your knit fabric the appropriate length by 4 inches.  4 inch width should work for any girl size 4 and up. 
For a toddler or baby, you might want to use 3 inches. 


Sew the ends together and fold in half. Iron in half.

I will now refer you to my friend Kristi's fabulous video tutorial on how to sew the binding to the neckline.  If you do not have a serger, just do a zigzag stitch instead.


And voila!  
One true upcycle dress, Rainbow colors, Lego Friends tee in the middle!


Tuesday, May 14, 2013

Rainbow Upcycle Lego Dress - a tutorial (part A)


 Last fall, I saw this tutorial over at Lil Blue Boo, for a pieced block dress, and bookmarked it. I wanted to try it!  Not the blocking, but the piecing. It is just a cute look, not something we normally do here in this house.  I like to try new techniques!  But, I didn't want to buy the pattern she sells, only because I already own so many patterns. I figured I could wing it.  And I did.  Not only did I wing it, I barely even pinned it!!  And it was almost entirely made on my serger.   This dress is that easy to make!

Here is how I did it. 

Part A -  The skirt

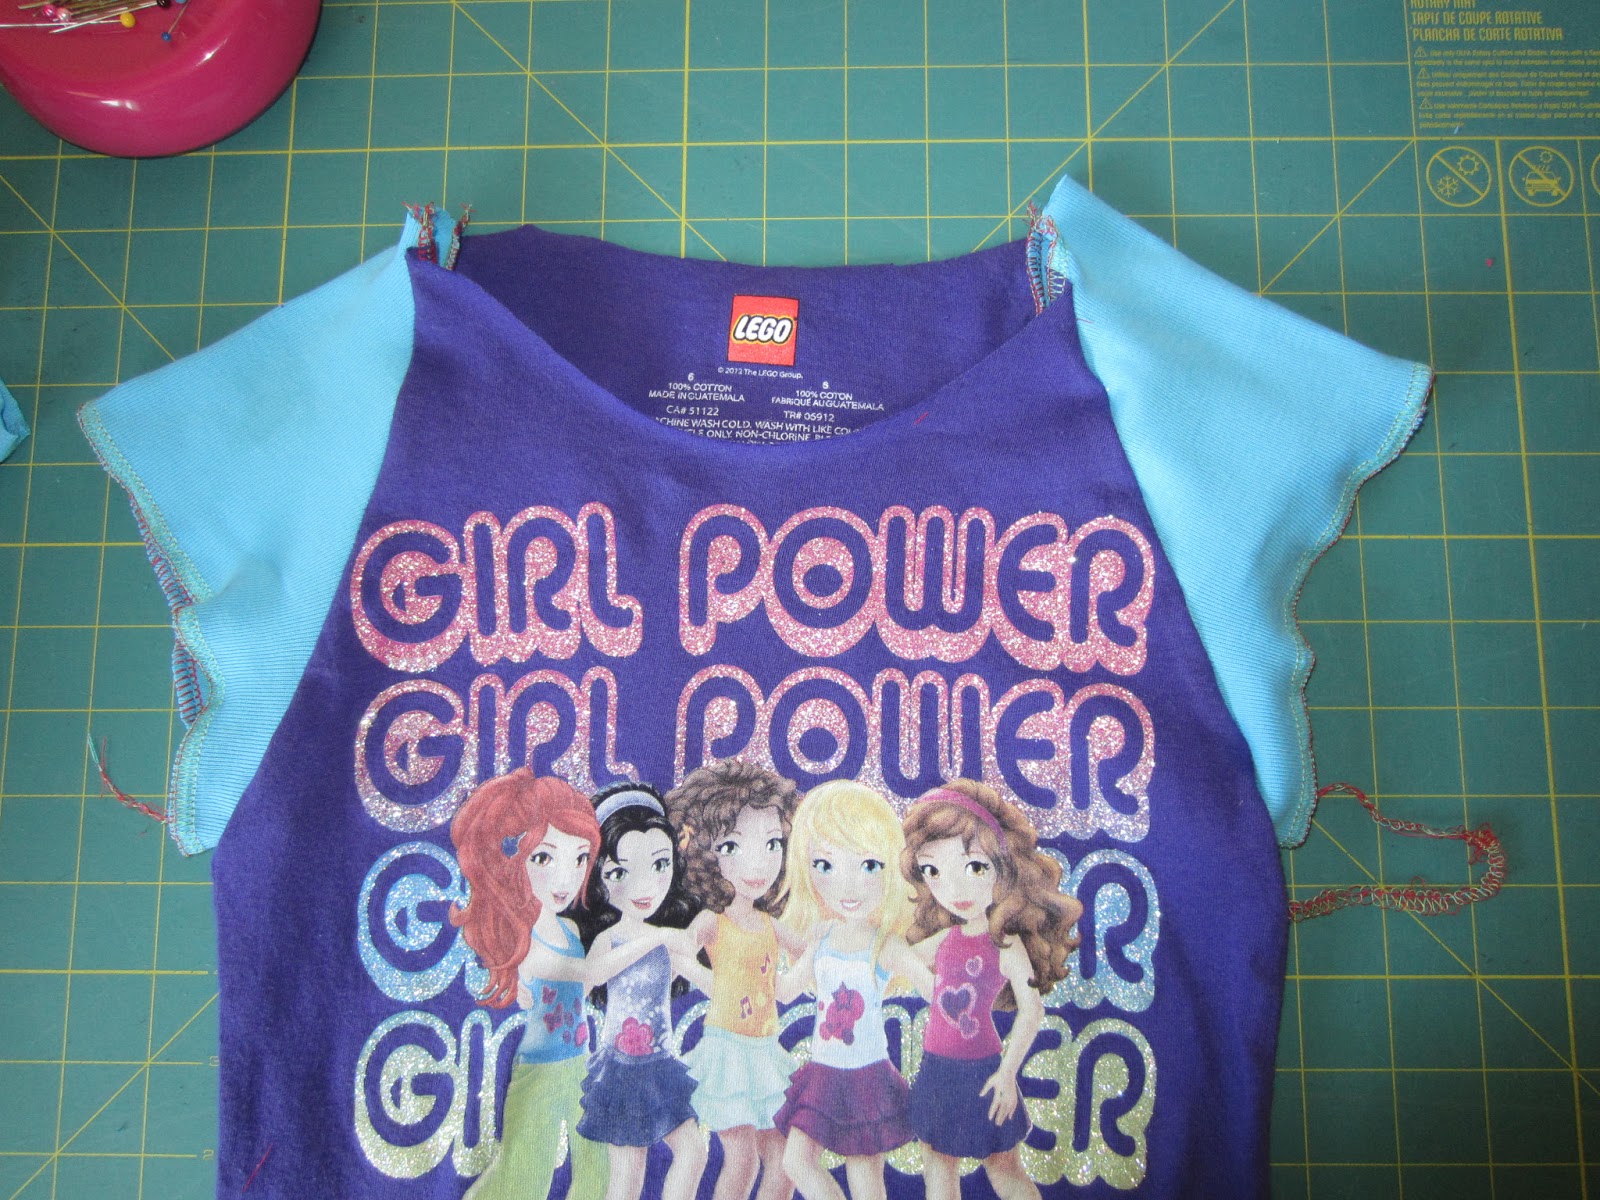
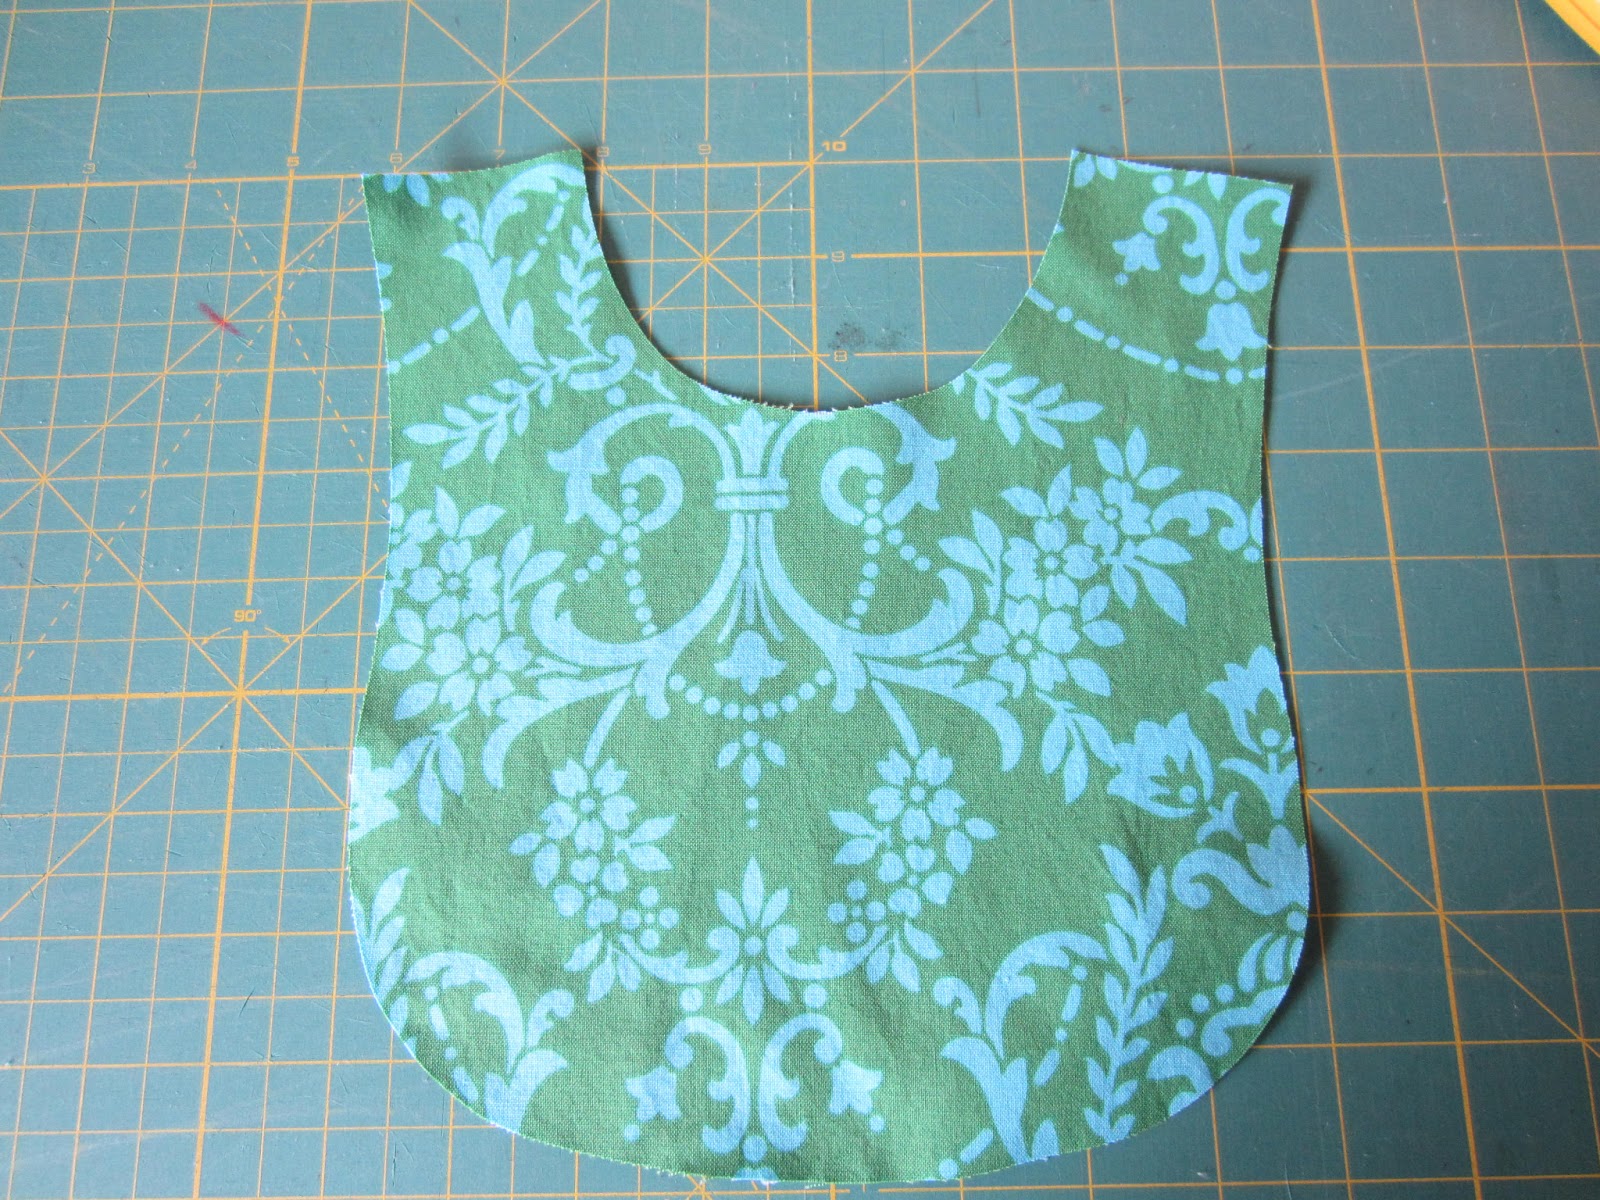
First, buy a tshirt or find one in your closet.  Here are two Lego Friends tees I bought, one from Zulily and one from a friend.


Next, find the fabric you want to use for the pieces.  In this case, I had a rainbow of old Hanna Andersson tees I needed to upcycle.  They have served me well for several years now but, each one having at least one stain, it was time for them to move on.  Since the fabric is just too nice to turn these into rags, into the upcycle-me bin they went!
 

Aren't they pretty? It's a rainbow!!
 

First, I went through each tee and cut off the unstained portions. You can do this with any old knit items you own. Just cut off the stained parts and keep the good parts for future sewing projects. In this case, all the tops had stains that I could not get out.


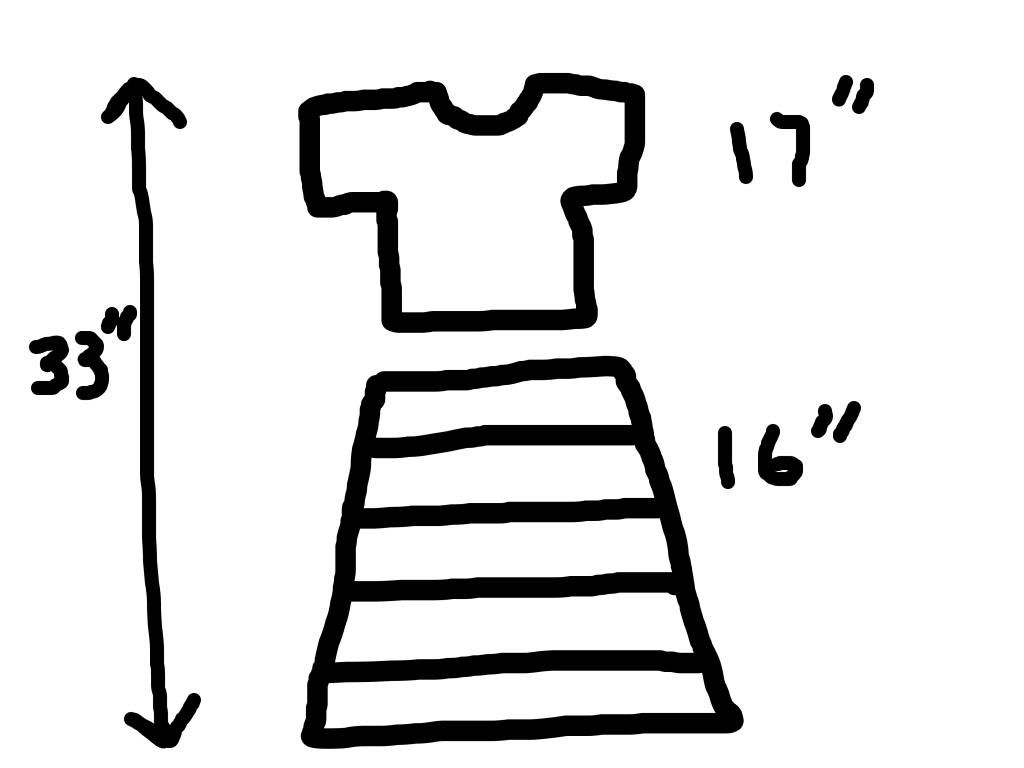
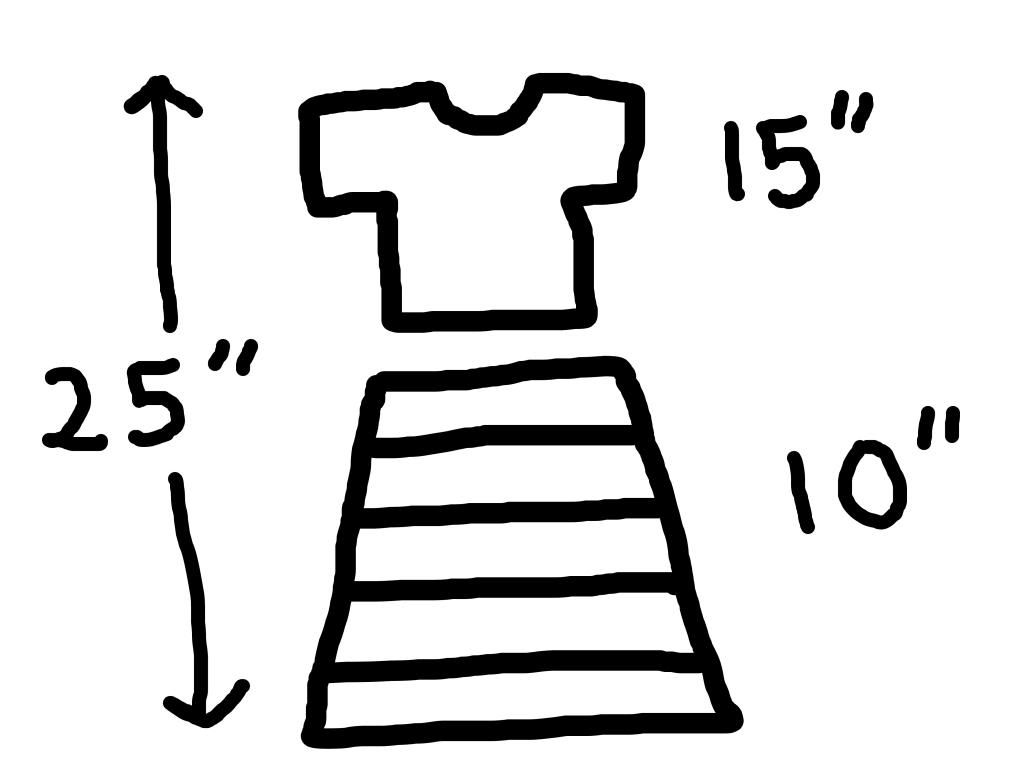
Now is the time for some math. You are going to want to figure out your total length (shoulder to where you want the skirt to fall) and then figure out where you want to cut off the tee.  The total length minus the tee length is your skirt length. 

Here are big girl's numbers:


Here are little girl's numbers:


You are going to want your skirt strips to be wider than the tee, so you can angle it A-line.  So, grownup items work great for upcycling into children's items.  My tees are wider than the girl's tees, so this was no problem for me.  If you need measurements, take the waist of your tee, laying flat, and make your strips four inches wider on both sides.   So, a 13 inch waist tee would need 21 inch-wide strips. 

Because I have five strips of fabric, I cut five 2 inch strips for the little girl's dress and  three 3" strips plus two 4" strips for the big girl's dress. Basically, take the total length you want your skirt to be and cut strips of fabric that will equal that length.  For each additional piece you add to the dress you will need to add a 1/2″ to your pattern length to account for the seams.

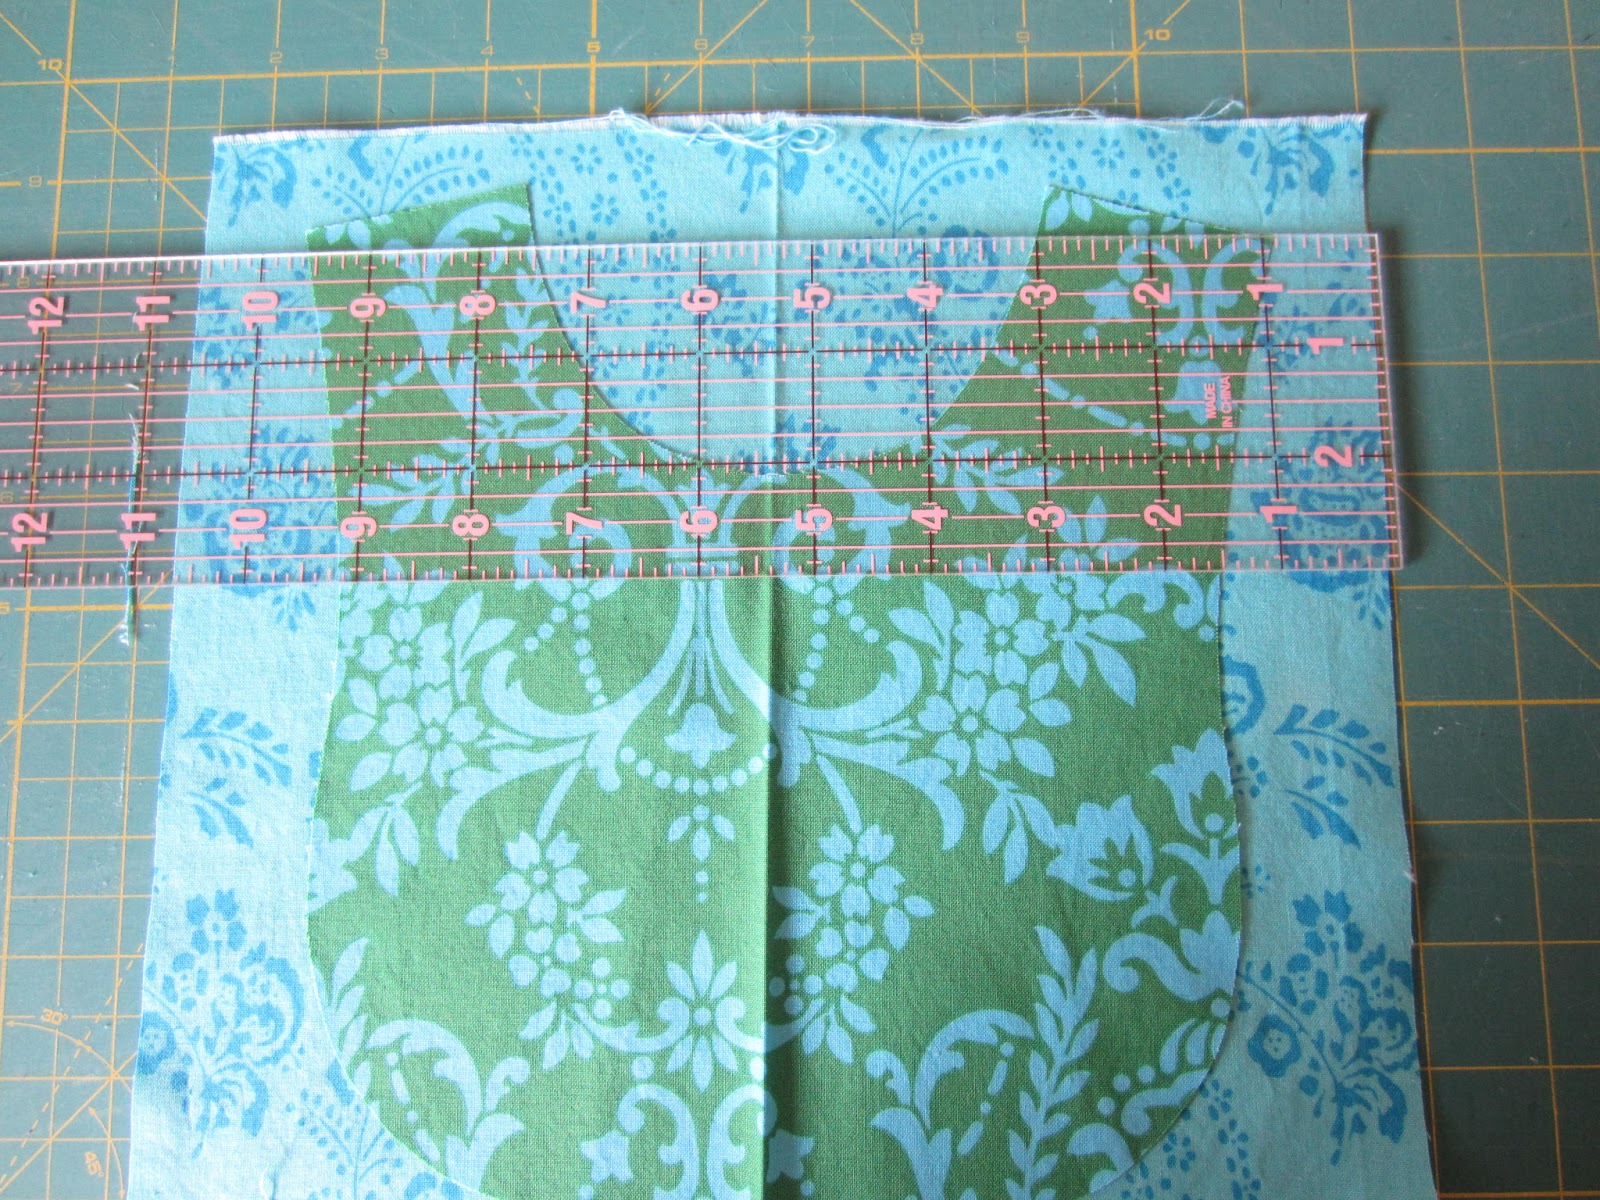
Now, center your tee on top of your strips, like below:


I want the skirt to be A-line, so I measure 3/8th of an inch off the edge of the tee (you want good seam allowance measurement here) and then angle my ruler a bit. Because I centered the tee, I just angle the rule to the bottom edge and both of my skirts will have the same width at the bottom.


Voila


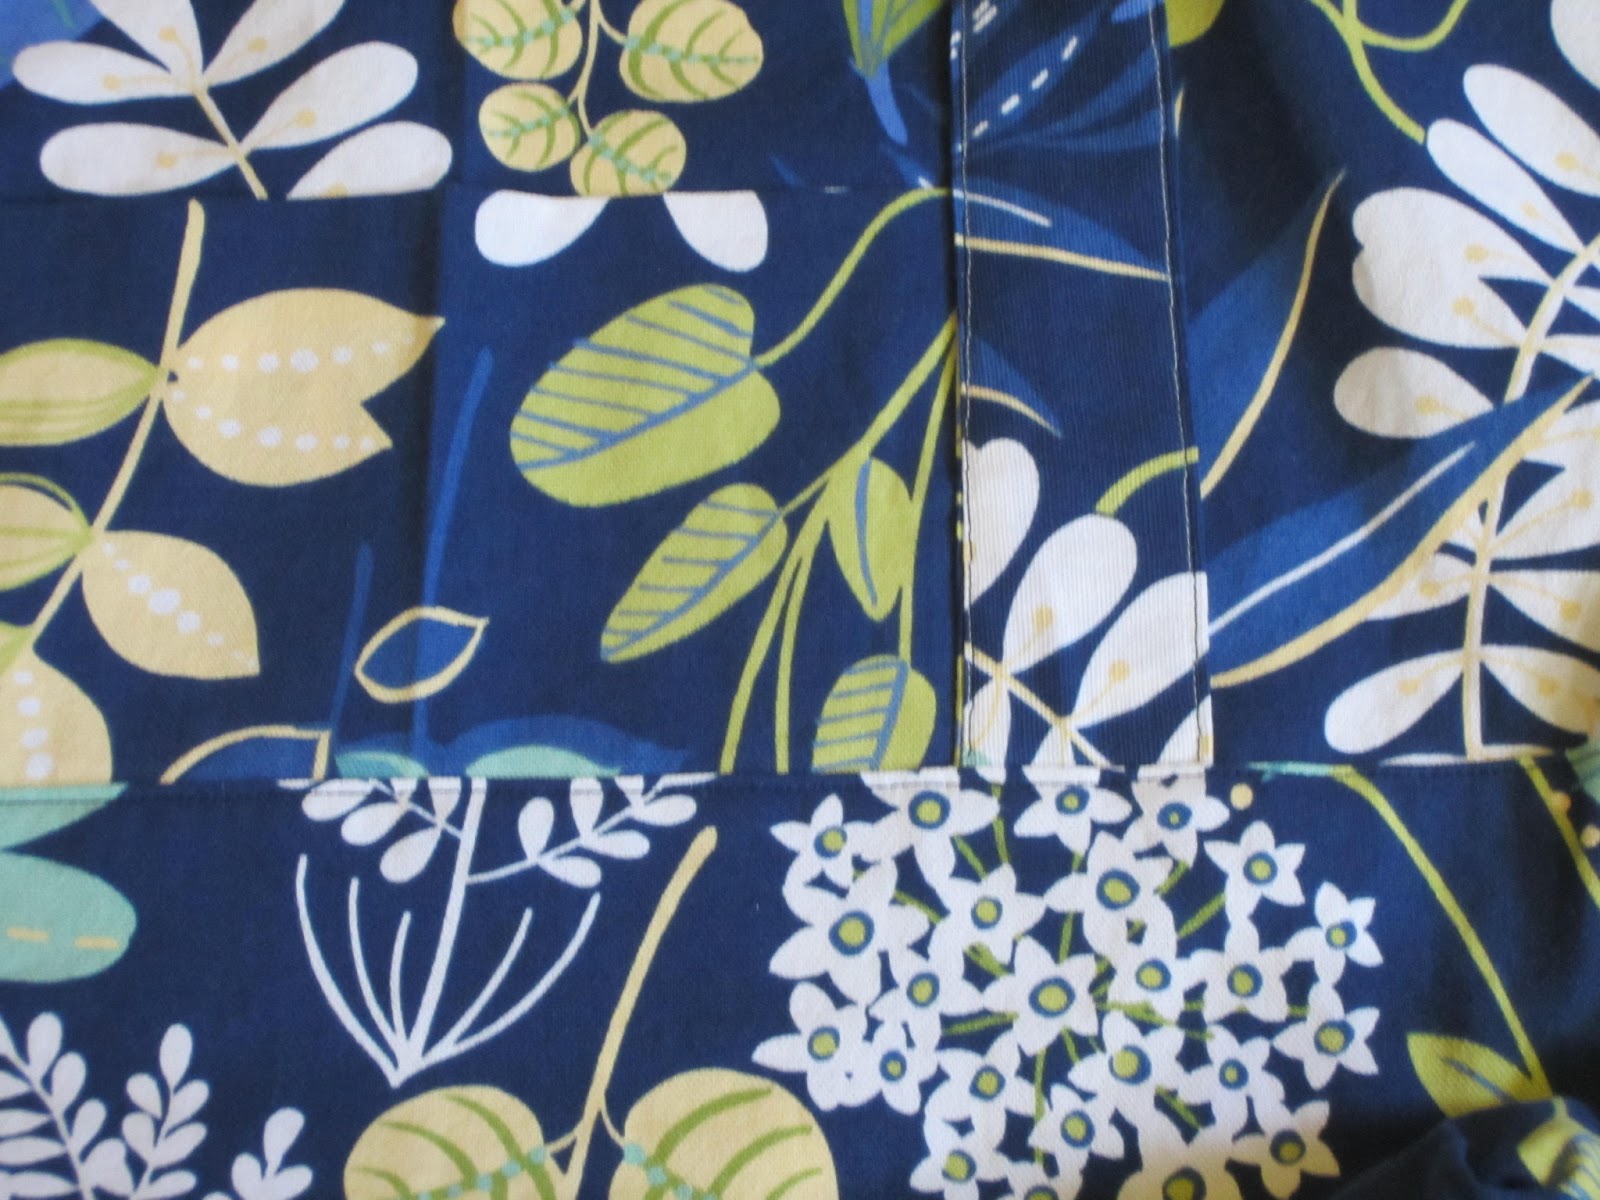
Now, I serge the skirt pieces with wrong sides together.  Keep your skirt laid out on your work table and take one piece at a time. Make sure wrong sides are together when you serge, so the serging shows.  You can also do a rolled edge.  They both look nice and are trendy right now. 


Work carefully, so you get the serging on the correct side!  You don't need to cut anything off while serging so you can even disengage your cutter. I just used my cutting blade as a guide.

  
Here is one side, all done. Look so fun!


I used a rainbow of threads for my rainbow upcycle!


 When you get both sides of the skirt done, pin them right sides together. The photo below shows me lining up the serged edges. I wanted them to go UP, so I lined them up that way and pinned then in place. I also want each strip to match nicely at the side seam.


Use your sewing machine to sew them sides together, then serge. You can serge on outside or inside. I chose to serge on inside, like the LilBlueBoo dress.  After sides were done,  I serged the hem.  I normally do not like serged edges. They look unfinished to me. But, for this dress, it seemed fun to use this as a theme.


To finish the hem, leave a long tail on the serging. Then, use an embroidery needle to thread your serger tail back through the serged hem. That will secure it nicely.


To attach the skirt to the tee, put the tee inside the skirt, wrong sides together.  Pin it in a few places, to keep it lined up, and serge the two parts together. Make sure you remove the pins as you serge!!


And here they are again.  The girls love them. They are comfy and fun.


Next up, sleeves!  Look for Part B on Thursday.  


Thursday, April 18, 2013

The Perfect Party Dress - pattern review and pleated bib tutorial


This week, I had the pleasure of testing a new pattern from Tie Dye Diva.  I really do love her patterns! There is a simplicity of style to them that pleases me.  I am not a fan of mega ruffles (to each, her own). And they are always written and tested to precision, so I know they are going to fit great and look great.  This one was no exception.   Here is The Perfect Party Dress. We don't actually have a party to go to but hey, why not wear a tiara at home?


This dress is about knee length, so it looks very sweet for spring. It has a front sash piece that is attached to the bodice and then two sash ties at the side.  It should have four buttons down the back but I made a goof and only did three. That is not the pattern's fault. I failed to pay attention to directions.  My bad.  However, the pattern is very well written, the bodice is fully lined, and the bodice instructions help you create a gorgeous bodice.  There are plenty of pictures in the pdf pattern document for you to easily follow what Jen is describing. The pattern also has an optional bib piece, which I chose to sew. 


As you can see, the bib is quite wide so it looks classy to me, not like a baby bib. My almost six year old daughter was concerned about this.  The bib itself is a simple piece but Jen shows you how, in the directions, to add ric rac trim or you can do a ruffle trim.  I also added some pleating and will explain how I did that below. I really like this pattern and highly recommend it. I love a pattern that has a lot of options. I chose not to do the ruffle on the skirt and added ribbon trim instead. But, you could easily bling this dress up or down. Following the finished measurements guide, I made a size 6 for my size 6 daughter and it fits perfectly. 


So, here is how I made the pleated effect on the bib. 

First of all, I cut out the bib piece as per the pattern.


Next, I took the fabric I wanted to use to create the pleats and cut a square of it that is about one inch all the way around my bib.  I am writing these directions so you can do this effect with any size bib. My bib in this picture is for a size 6. 


As you can see, it is about one inch larger than the bib. 
It does not have to be 100% exact.


For the next step, iron the bib and the pleat fabric in half, so you have a line down the middle of each.  You can see that above.  Iron the sides of your pleat piece down one inch. You can see this below.


Align the middle of both pieces of fabric and pin your pleat piece down to your bib, right side of bib to wrong side of pleat piece. The ironing line is the mark of the middle. 


Now, you are going to pull the side seam of the pleat piece over about one inch from the fattest part of the bib, as seen below.


Pin into place. 


Make sure the top of the pleat piece is covering a bit of the top of the bib. Below, I have lifted my pleat piece to show you how it covers just a few centimeters of the top part of the bib.


When it is laying down, it should barely cover that top bib piece. Make sure your pleat piece sticks out about an inch over the top and bottom of bib.

Now, this part is a bit creative.  I take the fabric in between the two pins and just fold it over until it looks centered, with the fold going away from the middle. Since I am writing this tutorial for every size, there is no measurement here. Just eyeball it and redo it as much as you need to do until it looks good.


 Pin it into place on both sides. Measure to make sure your two pleats are about the same size. My middle pleats were both 1 and 3/8ths inch from center line and my outer pleat was 1 inch from the middle pleat.  Don't be afraid to unpin and redo.


When I look at the underneath of the pleat fabric, I can see that the pleats look symmetrical. Yay!


Pin it down a bunch.


 Top stitch the pleats. You don't have to stitch down the middle if you don't want. It just depends on what is in your creative brain!  What look are you going for?


Turn it over and trim excess. 


Add embellishments, if you desire.  Finish the bib as per Jen's directions in The Perfect Party Dress pattern.  Enjoy!


Here is what my finished bib looks like.  
 added this lovely wide ribbon from Les Bon Ribbons down the front. 
If you don't know this store, you MUST check it out.


And, here is the pretty princess in her Perfect Party Dress.


Happy Sewing!


PS This is this week's tutorial but I was so busy with the dress on Tuesday, I couldn't get the tutorial done on time! Sorry!