Showing posts with label crafts. Show all posts

Thursday, December 12, 2013

Jennifer Paganelli-inspired holiday decorations


Do you love Jennifer Paganelli's SisBoom blog and fabric? I do!  And now, thanks to my lovely friend Jenny, of Sew Pretty Dresses, I get to participate in The Twelve Days of Jennifer Blog Tour!  For twelve days, some of us crafters/bloggers who also love Jennifer's crafts and fabrics are going to use her as inspiration for holiday sewing and crafting.  

First up, my JP connection.  I "met" Jennifer through Jenny. Jenny and I have been blogger buddies for a few years now, back from when I had my old blog, Too Many Hannas (because my girls had too many Hanna Andersson dresses). I started the Facebook sewing group, Handmade Dress Haven, and Jenny joined up and, at some point, added Jennifer and, at some point, she and I also became Facebook friends.  I have run the Facebook group for about four years now and I cannot remember exactly when this all happened, but, suffice to say, once you are friends with Jennifer, she becomes one of your cheerleaders and you cannot help but do the same with her. She is just THAT sweet and THAT inspirational.

So, for the last two months, I haven oohing and aahing at Jennifer's Facebook feed, full of lovely holiday craft items, mostly for sale at craft fairs near where she lives in Connecticut.  Since I literally live on the other side of the country, I have been only ogling them until the last two weeks.  I finally decided to do something inspired by her and now, with this blog tour, I get to share. I made three things, all inspired by Jennifer.

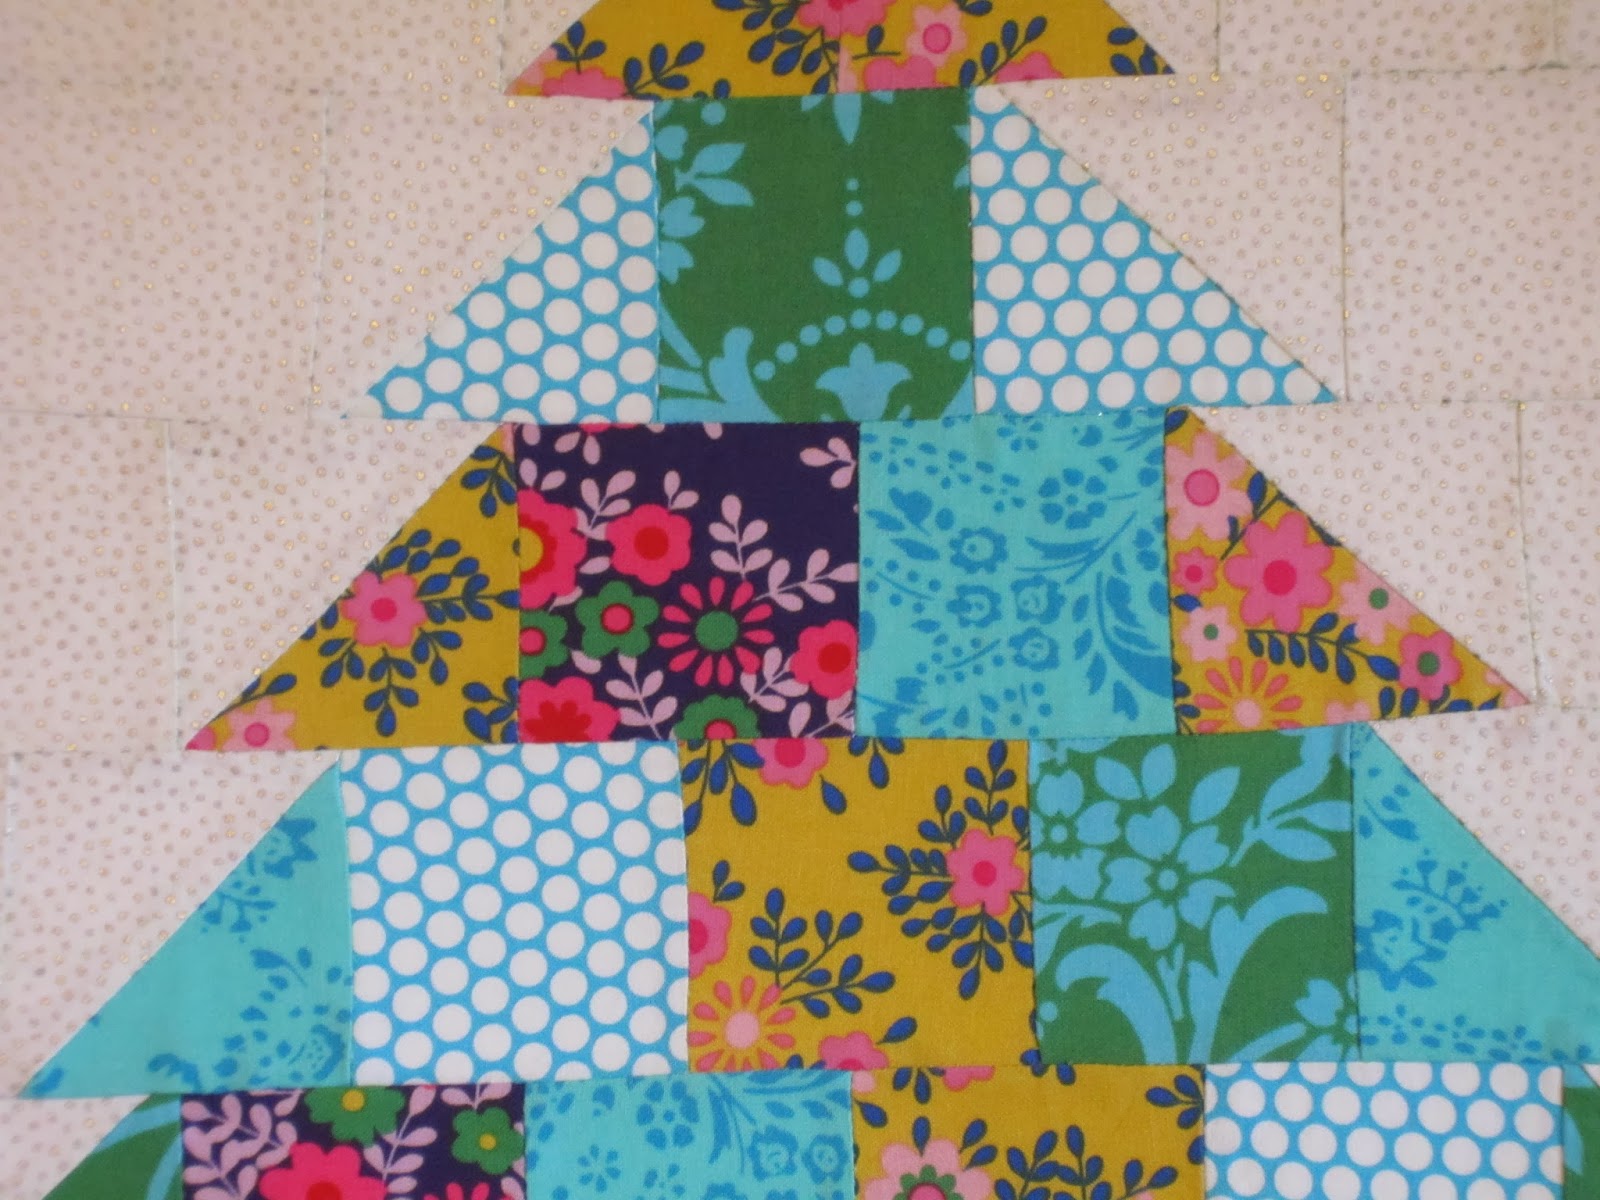
My big project is this little quilt!  Isn't it sweet!  I do not quilt, so this little quilt was a big deal for me.  As I was scrolling through the Sis Boom Blog, I found this post, from 2012. It totally inspired me to want to do something like a quilt.  I googled and googled and googled until I found this cute, free, quilt pattern.

And here is the result:
 

I chose this project because when I was a small child, my family lived in Panama for a few years.  One of the items we brought back with us is a wall hanging of a woven christmas tree. The bright colors always made me happy and I wanted to make a christmas tree wall hanging for my family. 


First step, I cut and arranged all the little squares and triangles and rectangles. 
 

The colors and patterns look so pretty together! They are not all from the same JP fabric collection, but they still look great side-by-side. 


I am not a quilter and do not have a walking foot but I think I did pretty good sewing it all together. The lines are almost all straight!!


I like how the bottom turned out, with it looking like a tree trunk. 
 

The extra fabric I used, from Joann's, is shimmery!  
It's like the tree is in a shimmery, fairy forest. 

The other projects I did are here. I have a lot of Natasha, in green, from Crazy Love, and I decided it would be lovely as ornaments. 


For this little wreath, I cut one inch long strips of Natasha and wound them around a small floral wreath. Tip: Put the glue on the wreath, not the fabric, and then gently pull on the fabric as you wind it around. That will make the fabric fit snug against the wreath and you won't have gaps. I would ric rac around it and added this little fabric strip "poinsettia" at the top. It's cute, huh?


I did something similar with this foam ball. I had planned to put a lot of sequins all over it but those dang things take a long time to push into the foam so I settled with four sequins in each section.  

Shimmery! Festive! Fun!  Just like Sis Boom!!

Please join the rest of the tour to see how others use Jennifer's inspiration for holiday sewing and crafting.


Friday, April 13, 2012

Trying to be more organized

As with many creative people, sometimes my creativity overwhelms my work space.  That is a kind way of saying that sometimes we let our work space get messy!  Having recently won a contest at The Cottage Home blog that included some of these Fabric Organizers, I had some of the tools I needed to organize my space.  What I lacked was proper space in which to put them.  I really want to get some new shelves but until I can make the trip to Ikea, I decided to clean out my cupboards and find a way to make these work. I really needed to get my fabric away from my cats! They keep using it as a bed!

So, here is what I came up with.

my sewing room
 I was very lucky to find this built in craft area already in the house we bought 6 years ago.  I took the space over as my crafting and computer area.  I also have my mom's old sewing desk.  But I was not using the space well. There were bins and small shelves of fabric everywhere! So, I moved all fall and winter fabrics into bins in the garage, put all knits in one big bin and put the rest in the cupboard above my work area.
olfa cutting mat
 Here is my work area. I share the space with our filing cabinet, which I really want to organize and move into the garage. I have my growing collection of Ottobres in a magazine holder and bins with current projects cut out and waiting to be sewn.  My kids helped me decorate, by the way.
organizing fabric
And here is the cupboard above my work area! Thanks to Lindsay at The Cottage Home and another mama I did a trade with, I now have a lot of fabric organizers. I am not even using them all!  When I get some proper wooden shelves for the room, I will use the rest.  For now, these are the fabrics I anticipate working with in the next few months.

organizing ribbons and notions
 The cupboard next door has the growing lace and elastic collection.


Thanks for looking. My space is not exciting nor will it ever be featured in a design magazine but it is very workable and usable and I am going to continue to make it more and more organized and efficient!

Friday, February 10, 2012

A pretty mermae

I am hobbled, a bit, from too much sewing due to a herniated disc in my neck, which is causing some mild nerve pain in my left arm. Luckily, I am left handed, so I am able to do a bit of sewing. It is just not good for my neck to do too much.  But this little project was perfect.  This is the mermae doll pattern from Bit of Whimsy Dolls.   My 8 year old daughter is an accomplished artist for her age and she decided to design how she wanted her mermaid doll to look.  We took the design to Joann's and found all the appropriate fabrics and thread colors.  This little pattern comes as a pdf and is very easy to follow.  The pattern even has a link to a video showing you how to embroider the face.  As I am not an accomplished embroiderer, this was very helpful.  So, here she is!   We made a few slight adjustments to her hair and her tail width, so she fit the picture my daughter drew.


Sunday, January 1, 2012

New Beginnings

 It has been over a month since I lasted posted.  In that time, my sewing machine, a 20 year old basic Singer, has given me a lot of grief.  Thus, began the path towards a new sewing machine.  I thought it would take me a while to save up the money to buy the one I wanted but my lovely husband threw some into the pot from his bonus and I was able to buy my dream machine, a Janome Memory Craft 5200.  


 Isn't she loverly!   


And she has all these stitches and more on the back of this card.  I am just thrilled with her capabilities and power and her quiet, strong motor.  A huge step.

So, to begin to use her, I decided to make a few of these Bit of Whimsy Mermae dolls.  I bought the pattern from her website and the pdf came right away.  It is a well-written pattern with lots of good hints.  I especially liked the Youtube video about embroidering the face.  It has been a while since I did any emberoidery!


So, here is the finished doll.  This is dolly #2.  The first doll was a rough draft, so to speak.  This one, I have been told, is not perfect  But, I think she came out pretty cute and her next mates will be even better.


I like the zigzag stitch feature on the new machine.  
It was very simple and easy to sew this bodice top.

Sewing her face together was not hard at all, thanks to the video on embroidery.  


The new machine has such lovely stitches, including this one we all think looks like waves.


So, look for more stuff happening in Kathy's sewing area starting today.


Happy New Year!


Wednesday, May 19, 2010

Major craft project necessitates longest blog post to date!

I  have not attempted a major room overhaul in about 8 years.  Sure, I do bits and pieces of decorating every year but to take a room and dramatically transform it is not something I do a lot.

So, this project has me a bit anxious!  I am taking the man cave slash den of our home and transforming it into a little girl's room.  Everything had to leave the room. The walls had to be stripped bare of pictures, the curtain removed, and the furniture moved out.  The walls had to be painted, new curtains sewn, bedding purchased, decorations crafted, purchases stealthed from all over the internet in order to keep within budget.  And the transformation, almost complete, is dramatic!

I won't post the before pictures as they are embarrassing.  You just have to imagine a room cluttered with music magazines, instruments, bicycle gear, books, and random clutter.  Walls dinged up from guitar cases.  Children's art taped to the walls.  The carpet hidden underneath teak furniture and dark persian rugs.  The exact opposite, in every way, of what a little girl's room should look like.

It all started with this quilt.  I went a little gaga over it.  The bed, a queen, will be the centerpiece of the room.  A queen seems like a big bed for a three year old but we wanted to keep the flexibility of still having a space for visiting relatives to sleep.  So, the bedding has to be spectacular, what with the bed taking up so much space.  The room is only 10 X 12 but the amazing quilt, Betsy's Dolls, from Pottery Barn Kids, is perfect!  Isn't it adorable!  The quilt has so many colors no one will get bored and the dolls are not so cute that she won't love it for years to come.


So, after ordering custom shams and pillows from Etsy, and finding the perfect white with lavender ribbon sheets from PBK, I moved on to the walls.  What color?  I knew I wanted to do a happy yellow but it took a few visits to Sherwin Willams to sort it out.   I have to say, they are very helpful and have great customer service.  And their online tools are great.   We ended up settling on Optimistic Yellow, at 50% strength, so it is half as dark as this color swatch. 


I chose the Duration paint because it is low VOC  (low stink means fewer toxins to breathe) and it only needs one coat.  True to it's word, it is the best paint I have ever used.  It went on easily and is not nearly as stinky as regular paint. 


Next up, my friend and neighbor sent me a link to a wonderful decorating site.  Oh curses!  So many great ideas I had to use some.  Lucy and Company do amazing work!  I cannot afford it nor do I even live near them but, thanks to Etsy,  Ebay, and Michael's craft store, I can make some of them work on my own.   Aren't these room pics delish?


Did I mention we have my daughter's name in wooden letters already?  I love this desk and shelving unit setup and will be searching far and wide to find something cheap we can transform to get this look. 

Beautiful!  

I found a seller on Etsy to make me tulips and daisies like these! I will paint and mount them on my own as a sort of mock headboard, just like these.  


I also found a lavender gingham bedskirt from PBK on Ebay and a twin bed sheet set to match.   The bedskirt will fit the queen-sized bed, but the sheet set I will use to make a valence and to cover a bulletin board that I got at Michael's.  If I have fabric leftover, I plan to make a long bed roll pillow like in the picture above.  Such fun!  And I love the old desk transformed with paint.  My friend will help me to find a desk that will suit our needs and then I can paint it to match.  Being as little one is only three, we are in no hurry.  It could even be a small table instead.  I love the covered stool, in the pic of the desk, as well as the bulletin board with the hand painted frame.  Finally, an old table transformed with paint into a bedside table!  What a fun and funky idea.

So many great ideas just from one website!


The first stage of this room transformation will be done this weekend and I will post pics then.  What fun!


Sunday, May 16, 2010

I have been busy

Holy cow, has it really been two weeks since I blogged! I was out of town for the week of mother's day, visiting my lovely mother in Oregon.   Upon my return, I have been decluttering and organizing my home like a crazy woman in order to give my soon to be three year old her own big girl room.  So exciting!  But busy. I have also been planting our new food garden.  We have three planter beds now with peas, beans, potatoes, pumpkin, walla walla sweet onions, beets, two lettuces, and two different kinds of carrots.  What a ton of work to turn a section of lawn into planter beds.  Kudos to my hubby for doing the brawny, manly work and leaving the fun jobs (the actual gardening) to me.  To this, we will add our berries and fruit trees. Don't have any new pictures but here are some old ones.

These are berries are from our last year's crop:  Blueberries, raspberries, marionberries, and strawberries.


Here are some pears. I don't know what they are as the trees, which came with the house, have grafts of four different pears on each.


Here is the bedding I chose for my soon to be three year olds new room.  Isn't it pretty?  I love it. It is called Betsy's Dolls and it is from Pottery Barn Kids. I got a great price because, luckily for me, I fell in love with it just as it was leaving the stores and was on clearance!  Had to order it from a store back east but who cares at the price I got!


Her room will be painted a pale butter yellow but I am lost as to what to do for the valence or curtains for her one window?  It has a blind so it only has to be decorative.  If you have any fabric suggestions to go with this quilt of many colors, please send them my way!