Showing posts with label upcycle. Show all posts

Friday, May 17, 2013

Rainbow Upcycle Lego Dress - a tutorial (part B)


 I hope you enjoyed part A of the Rainbow Upcycle Lego Dress tutorial for making the skirt. Now, let's make the sleeves and neck look purty!


 At first, I thought I would just serge the sleeve edges to give them some color. Not liking the look of it, I decided, instead, to do a true upcycle and take some of the fabric from my old tee shirts and make a new neckline and new sleeves. 

First step, cut off the neckline, staying as close to the original as possible.


Next, cut off the sleeves at an angle.  
Doesn't have to be exact but I would say that mine is a 60 degree angle.  
(for you math types)
 

Save the parts. These are your pattern pieces!
 

Cut open the sleeves, as above, and lay one of them on your fabric.  I have two pieces of fabric here.  Trace about 3/8ths of an inch all the way around. I have some tools for this job but you don't need them.
 

Look at your tracing and check to see if it looks even on both sides. 
 

Fold the fabric in half, at the middle of the piece, and cut out your sleeves on the tracing. By folding them in half first, you insure they will be symmetrical. When you open them up, they will look like this.  


Serge or hem them.  I serged with my rainbow of colors.  
You can use a rolled edge or regular serged edge.


Join the two small edges and sew or serge them closed.  
What you see here is going to be the inside of my sleeves.


See, it will line up nicely when you are done. 


Pin your sleeve and tee, right sides together.
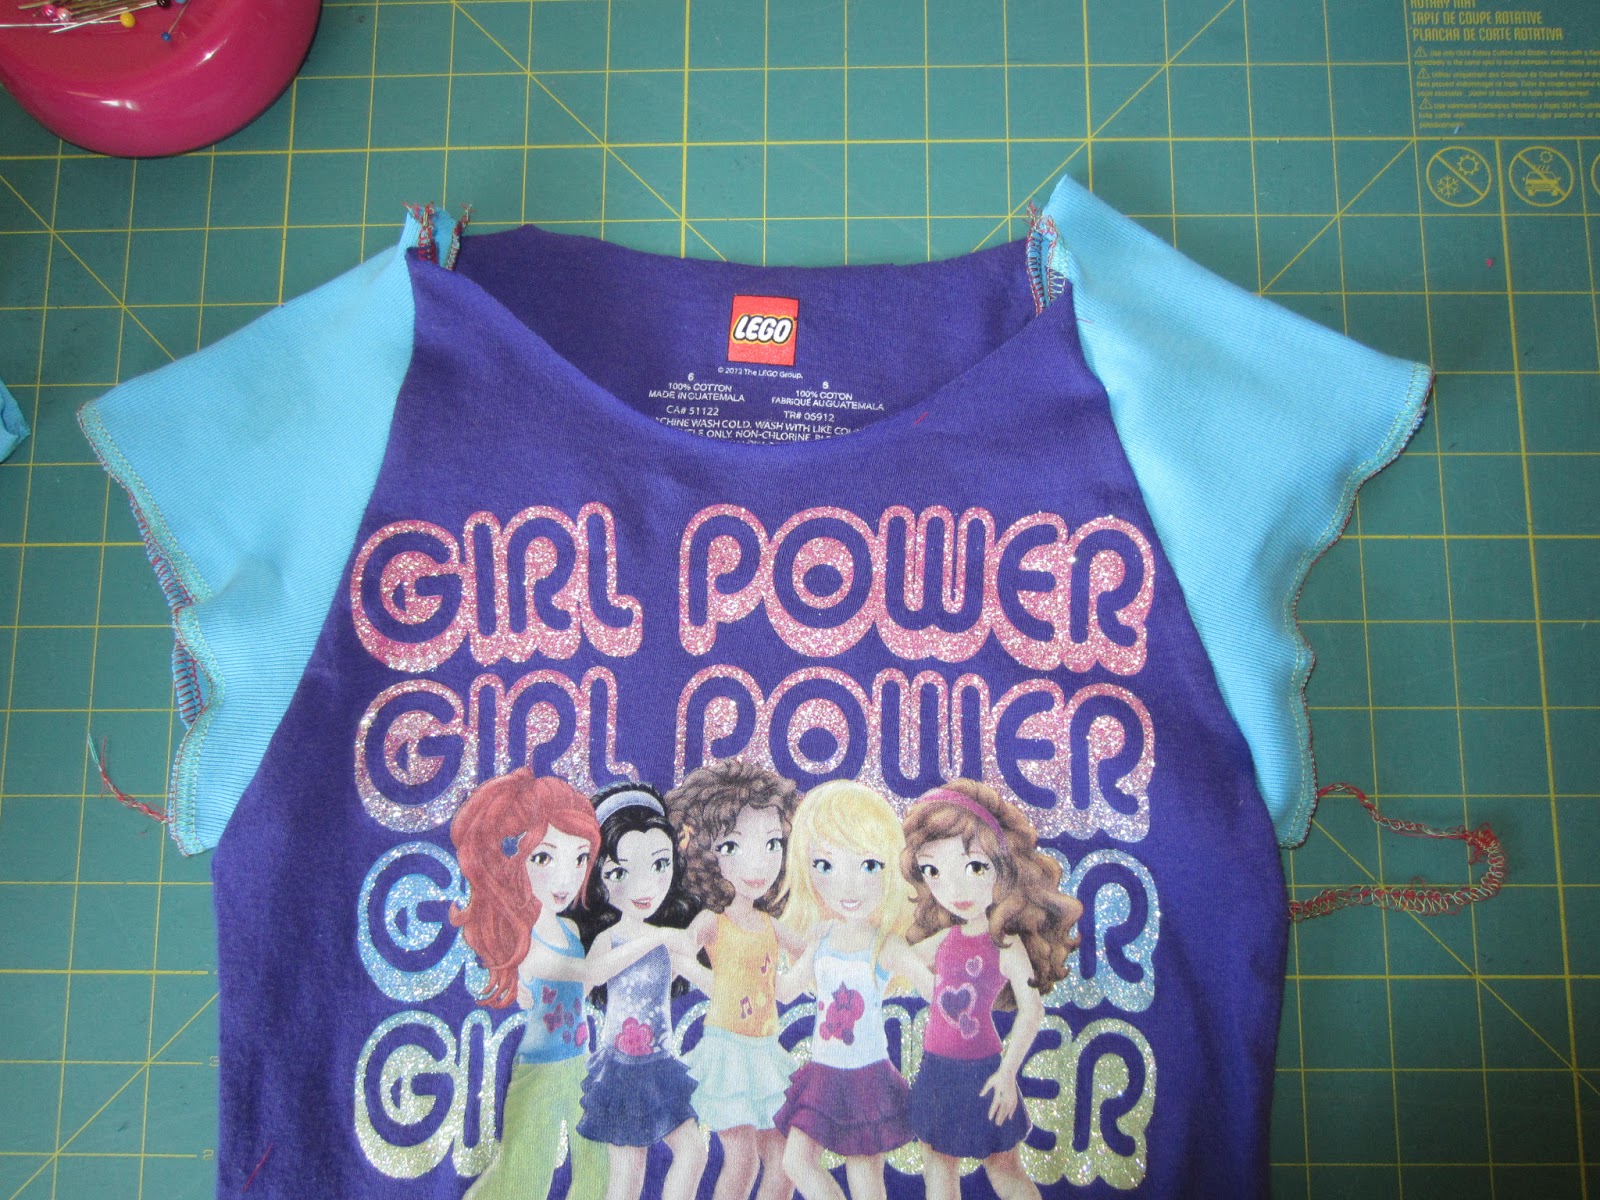

This is very important!! When you sew the sleeves to the bodice, you want to leave the middle three inches (give or take, depends on the size dress you are making) open for the shoulders.   You can see below that I did not make the purple bodice pieces meet. There are three inches left on my sleeve piece where it is not attached to the bodice.  
 

 Now, we are ready to work on the neckline. First, measure around the opening. Mine measured 23 inches around.


Next, measure the piece of neckline you removed. Cut it and lay it flat. 
Mine measured 19 inches. The rule of thumb for making a neckline from knit fabric is to use stretchy fabric with good recovery and cut it at 85% of your neckline size. 
So, .85 times 23 is 19!  Perfect.  


Note: recovery means how much your knit fabric will stretch back.  My old tees are pretty stretchy. I stretched the pieces a few times and they did go back to original length. Some rib knits do not. They will stretch out and stay there, which can be a major PITA. I have learned that the hard way!  You end up with a neckline that stretches out and looks wonky and doesn't lay flat. I now take my fabric and test the stretchiness before I attempt to use it for necks, cuffs, etc.  If it doesn't stretch out and back nicely, it doesn't get used. Here is an excellent blog post by One Little Minute about the types of knit fabrics. 

So, let's make a neckline! Cut your knit fabric the appropriate length by 4 inches.  4 inch width should work for any girl size 4 and up. 
For a toddler or baby, you might want to use 3 inches. 


Sew the ends together and fold in half. Iron in half.

I will now refer you to my friend Kristi's fabulous video tutorial on how to sew the binding to the neckline.  If you do not have a serger, just do a zigzag stitch instead.


And voila!  
One true upcycle dress, Rainbow colors, Lego Friends tee in the middle!


Tuesday, May 14, 2013

Rainbow Upcycle Lego Dress - a tutorial (part A)


 Last fall, I saw this tutorial over at Lil Blue Boo, for a pieced block dress, and bookmarked it. I wanted to try it!  Not the blocking, but the piecing. It is just a cute look, not something we normally do here in this house.  I like to try new techniques!  But, I didn't want to buy the pattern she sells, only because I already own so many patterns. I figured I could wing it.  And I did.  Not only did I wing it, I barely even pinned it!!  And it was almost entirely made on my serger.   This dress is that easy to make!

Here is how I did it. 

Part A -  The skirt

First, buy a tshirt or find one in your closet.  Here are two Lego Friends tees I bought, one from Zulily and one from a friend.


Next, find the fabric you want to use for the pieces.  In this case, I had a rainbow of old Hanna Andersson tees I needed to upcycle.  They have served me well for several years now but, each one having at least one stain, it was time for them to move on.  Since the fabric is just too nice to turn these into rags, into the upcycle-me bin they went!
 

Aren't they pretty? It's a rainbow!!
 

First, I went through each tee and cut off the unstained portions. You can do this with any old knit items you own. Just cut off the stained parts and keep the good parts for future sewing projects. In this case, all the tops had stains that I could not get out.


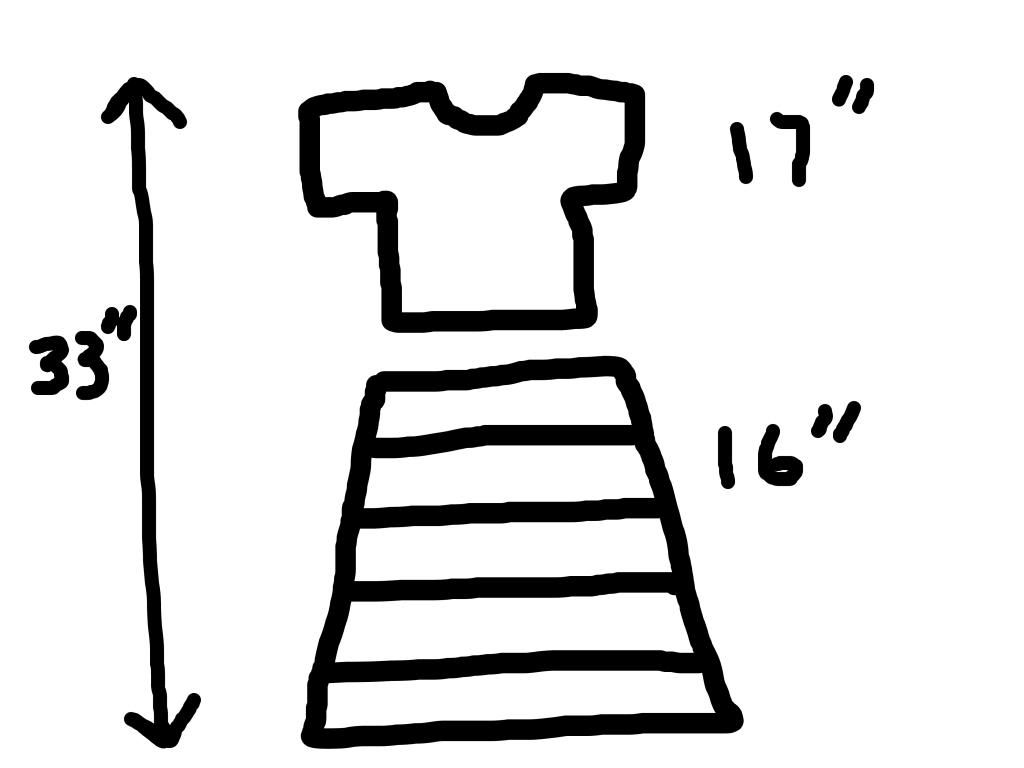
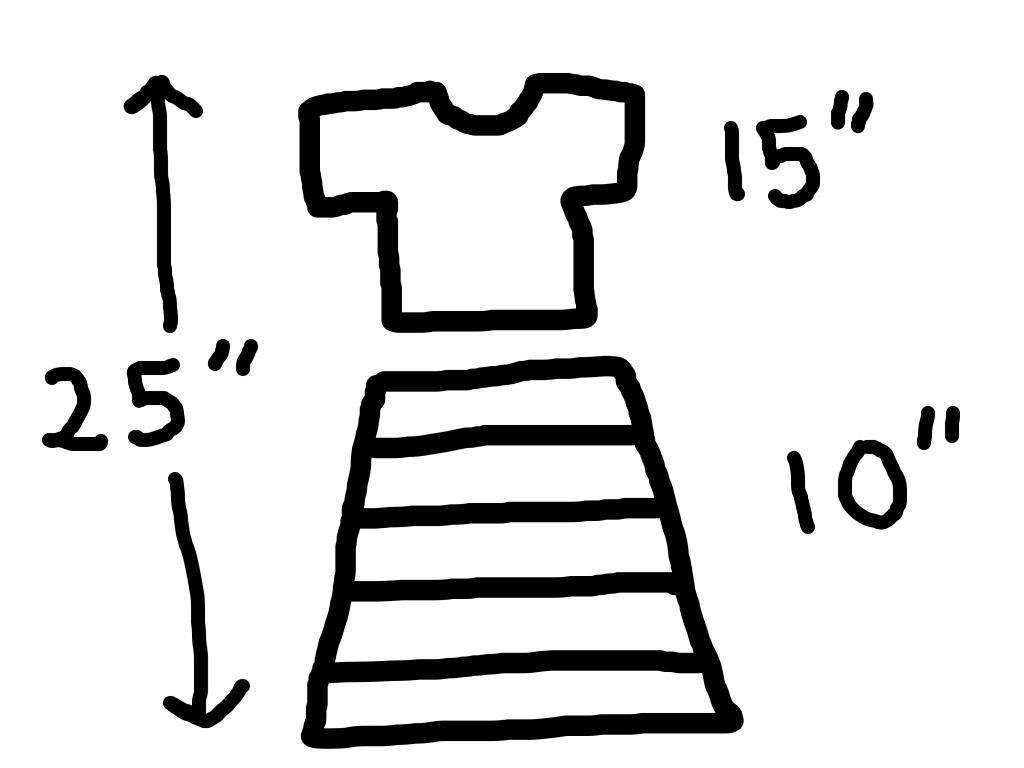
Now is the time for some math. You are going to want to figure out your total length (shoulder to where you want the skirt to fall) and then figure out where you want to cut off the tee.  The total length minus the tee length is your skirt length. 

Here are big girl's numbers:


Here are little girl's numbers:


You are going to want your skirt strips to be wider than the tee, so you can angle it A-line.  So, grownup items work great for upcycling into children's items.  My tees are wider than the girl's tees, so this was no problem for me.  If you need measurements, take the waist of your tee, laying flat, and make your strips four inches wider on both sides.   So, a 13 inch waist tee would need 21 inch-wide strips. 

Because I have five strips of fabric, I cut five 2 inch strips for the little girl's dress and  three 3" strips plus two 4" strips for the big girl's dress. Basically, take the total length you want your skirt to be and cut strips of fabric that will equal that length.  For each additional piece you add to the dress you will need to add a 1/2″ to your pattern length to account for the seams.

Now, center your tee on top of your strips, like below:


I want the skirt to be A-line, so I measure 3/8th of an inch off the edge of the tee (you want good seam allowance measurement here) and then angle my ruler a bit. Because I centered the tee, I just angle the rule to the bottom edge and both of my skirts will have the same width at the bottom.


Voila


Now, I serge the skirt pieces with wrong sides together.  Keep your skirt laid out on your work table and take one piece at a time. Make sure wrong sides are together when you serge, so the serging shows.  You can also do a rolled edge.  They both look nice and are trendy right now. 


Work carefully, so you get the serging on the correct side!  You don't need to cut anything off while serging so you can even disengage your cutter. I just used my cutting blade as a guide.

  
Here is one side, all done. Look so fun!


I used a rainbow of threads for my rainbow upcycle!


 When you get both sides of the skirt done, pin them right sides together. The photo below shows me lining up the serged edges. I wanted them to go UP, so I lined them up that way and pinned then in place. I also want each strip to match nicely at the side seam.


Use your sewing machine to sew them sides together, then serge. You can serge on outside or inside. I chose to serge on inside, like the LilBlueBoo dress.  After sides were done,  I serged the hem.  I normally do not like serged edges. They look unfinished to me. But, for this dress, it seemed fun to use this as a theme.


To finish the hem, leave a long tail on the serging. Then, use an embroidery needle to thread your serger tail back through the serged hem. That will secure it nicely.


To attach the skirt to the tee, put the tee inside the skirt, wrong sides together.  Pin it in a few places, to keep it lined up, and serge the two parts together. Make sure you remove the pins as you serge!!


And here they are again.  The girls love them. They are comfy and fun.


Next up, sleeves!  Look for Part B on Thursday.  


Saturday, August 20, 2011

A fair trade

One thing I love about the crafting community is how generous people are, especially with trading. I have never participated in a trade before but this one caught my eye.  On my facebook page, Handmade Dress Haven, a mama posted that she had a pile of Fabric Organizers she was not going to use and wanted to trade for a few handmade items for her daughter!  Right up my alley!  We ended up working out a deal where I made her two Ellie-style tops for her two year old.  As far as what I would charge for them, it worked out to be a very fair trade.  Here are the tops I made for her:

 First, this one is copied from my original Peacock knot dress, using Dena Designs Monaco fabric as the foundation.  The ribbon comes from Flame Cranium/Treasure Bay on Etsy.
This lovely is Benartex's Habitat fabric in the skirt and bodice.  Amy Butler in the sash and Benartex Backyard Butterflies in the straps.  This is one of my favorite fabric combos ever. I just love it!

She also sent me the legs from some brown linen-blend pants that she wanted to try to make into ruffle pants for her two year old daughter.  I was able to turn them into almost exactly enough fabric for size 2 pants!   Here are the finished pants.  They have two layers of ruffles.  The waist had to be made with the smallest elastic possible to give the pants as much length as possible. 

 I think it is pretty funny to look at how little I fabric was left!  I really maxed it out.  I loved learning how it was totally possible to upcycle a pair of pants!


So, now (TADA!) The Fabric Organizers! I have been wanting to try these but they are the type of thing that I don't often buy for myself.  I tell myself "you can just fold your fabric neatly, you don't need to spend money on fancy boards."  But, of course, the reality is that I don't fold my fabric neatly.  This is what my fabric looked like this morning:


One wire rack full of messy woven fabric, three bins with knits, fleece, etc. 

And here is what I got to work with!  I got 36 of the larger size and one small.  I assume the one small was a teaser.   These are from The Fabric  Organizer Company.  These are acid-free, white foam boards designed for long-term fabric storage and efficiency.  I love them so much I could hug the inventor!


Do you see the small rectangles cut into each?  Those are tabs that pop out for you to hold the fabric down.  Like so.  You then wind the fabric around until it is all done and secure it with another set of tabs.  At least, that is the idea. 


Now, I always have to do things my own way because my brain just does that.  (I guess that makes me a "divergent" thinker.)  Anyway, having only 36 to work with, and only at most 2 yards of each fabric, I decided to double up.  I put two fabrics on each and I organized them by color story.  Since I was putting more than one fabric on each, I secured the fabric with small sewing pins instead of using the tabs.  No biggie! I still love them!  


So, here is what my wire shelf looks like now! 

  I still just have the wire rack.  I am going to ask Santa for a nice shelving system for my sewing area for Christmas.  Or I could stop buying fabric and save up to buy one myself.          

Nah, that is no fun!  "Dear Santa, please bring me a shelving system for my sewing area that will fit under my window and hold my fabric organizers in a pretty display.  Thank you, love Kathy."


Until such time as Santa arrives with a new shelf, this is how I have to display the fabric.  On it's side.  But I do really like seeing the color stories.  It will be very inspirational to be able to see nearly all my fabric this way and get ideas for sewing. The picture above is the bottom shelf, where I put spring colors.


Here are the middle shelves, where I put colors that might fit any season.  That 
Hokkah Garden Night collection (black and rose) is calling to me right now.  The most gorgeous fabric ever!  Check it out!


Okay, now what to do with fat quarters and miscellaneous yardage? I will have to clean a bin out, I guess.


Did you know I had so much Benartex Ariana Cocoa Bubbles? Neither did I! 
I have like 4 yards! LOL!  The things you discover when you clean up your crafting area.

I also have a stash of Children at Play fabric in the cupboard.  Need more Fabric Organizers and more shelves!

And here is my Christmas fabric stash.  


Oh well, I am trying to be organized!